This tutorial uses the Background Removal API. See the docs, live demo, and pricing.
Wardrobe apps, resale marketplaces and styling tools all have the same problem: users photograph their clothes on a bed, a door or a kitchen table, and the result looks nothing like a catalog. A clothing background removal step fixes that. You send the photo, you get back the garment alone on a transparent background, and you can place it on a clean tile or combine several items into an outfit.
This tutorial builds that pipeline in Python with the Background Removal API: one function to remove the background, one to make square closet tiles and name the colors, a batch importer for user uploads, and an outfit board. Every script was run on real photos of clothes taken at home, and the outputs shown here are the actual results.
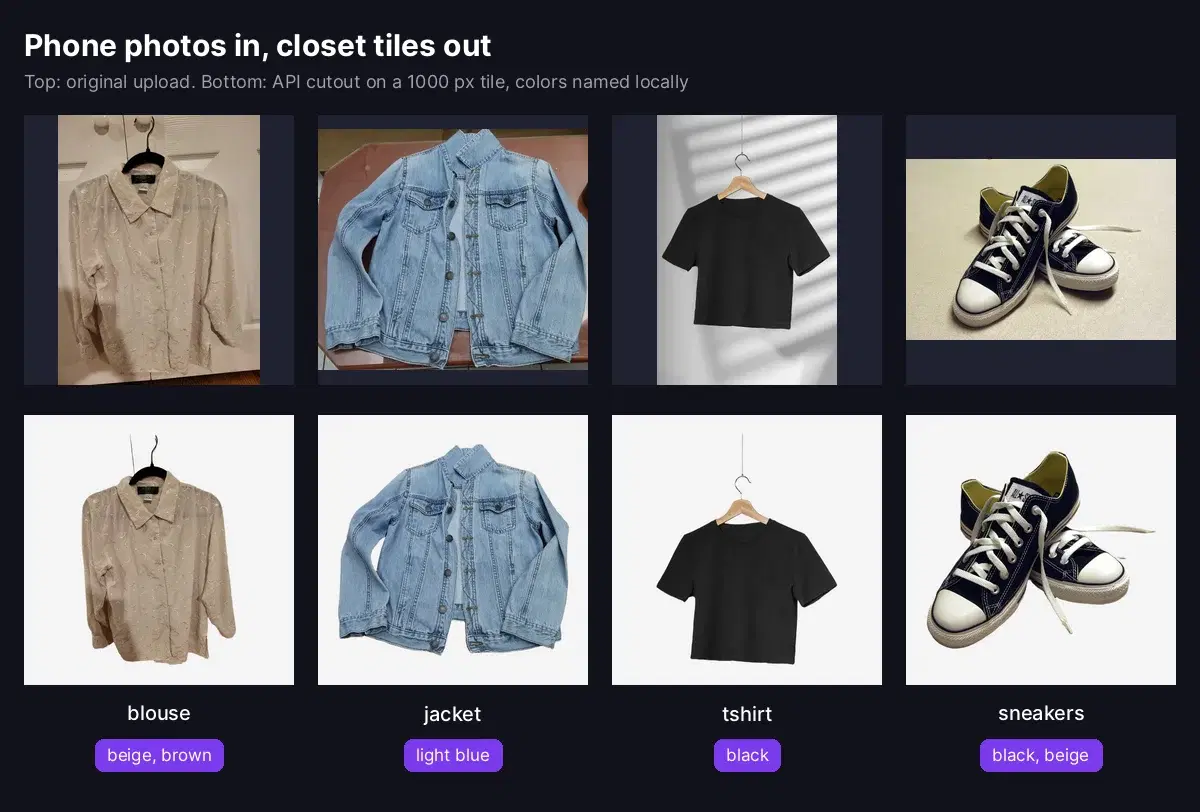
What the API Returned on Four Clothing Photos
We picked four photos that look like what real users upload: no studio, no plain backdrop, uneven light.
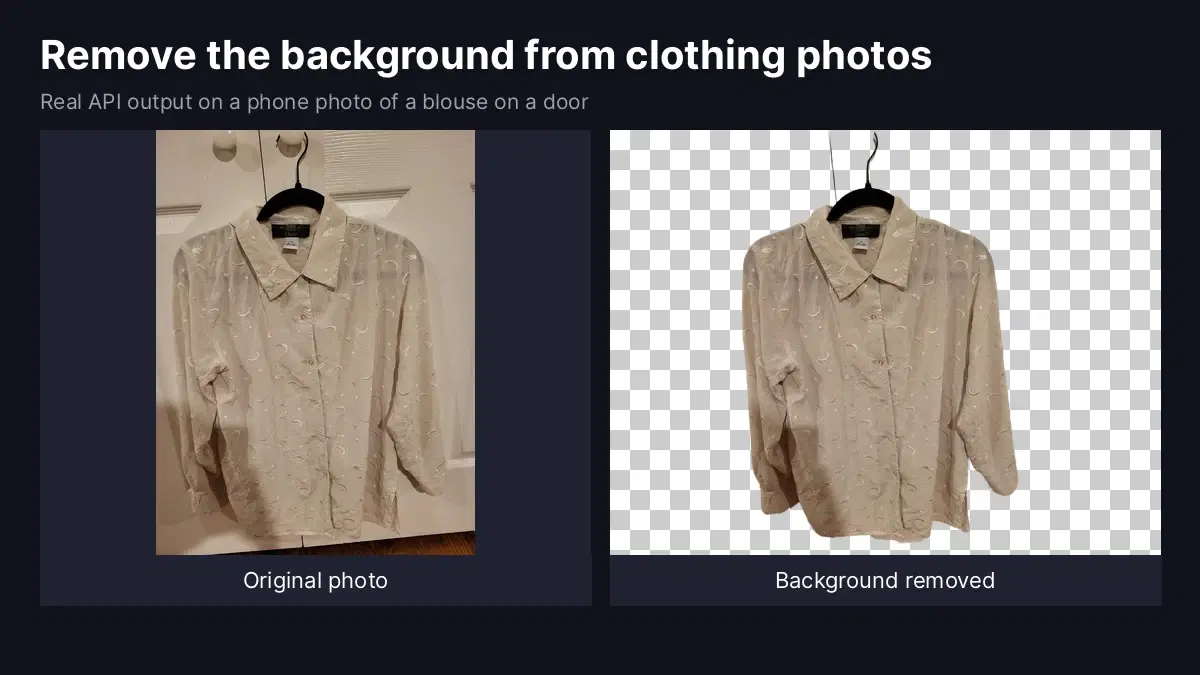
- Cream blouse on a white door. Light fabric against a light background, with door hinges and a hanger hook in the frame.
- Denim jacket on a wooden table. The jacket fills almost the whole frame.
- Black t-shirt on a hanger. Strong window shadows across the wall behind it.
- Black sneakers on carpet. Loose white laces that spread away from the shoes.
All four came back as clean cutouts in one request each. The blouse kept its edges against the white door, the window shadows disappeared from behind the t-shirt, and the loose laces of the sneakers were kept. The hangers stayed attached to the garments, which is the usual choice for a closet view.
Remove the Background from a Clothing Photo in Python
You need Python 3 with requests and pillow, and a RapidAPI key in the RAPIDAPI_KEY environment variable. Save this as closet_api.py:
import io
import os
import requests
from PIL import Image

API_URL = "https://background-removal-ai.p.rapidapi.com/remove-background"
HEADERS = {
    "x-rapidapi-host": "background-removal-ai.p.rapidapi.com",
    "x-rapidapi-key": os.environ["RAPIDAPI_KEY"],
}
MAX_SIDE = 1500  # phone photos are 4000 px wide; the closet does not need that


def remove_background(path):
    """Upload a clothing photo and return the cutout as an RGBA image."""
    img = Image.open(path).convert("RGB")
    img.thumbnail((MAX_SIDE, MAX_SIDE))
    buf = io.BytesIO()
    img.save(buf, "JPEG", quality=92)
    buf.seek(0)

    r = requests.post(API_URL, headers=HEADERS,
                      files={"image": ("item.jpg", buf, "image/jpeg")}, timeout=60)
    r.raise_for_status()
    png_url = r.json()["image_url"]
    png = requests.get(png_url, timeout=60).content
    return Image.open(io.BytesIO(png)).convert("RGBA")


if __name__ == "__main__":
    cutout = remove_background("jacket.jpg")
    cutout.save("jacket.png")
    print(cutout.size, cutout.getbbox())
On the denim jacket photo it prints the size of the cutout and the box around the visible garment:
(1500, 1339) (28, 0, 1500, 1339)The API responds with JSON containing image_url (a link to the transparent PNG), width, height and size_bytes. The function downloads the PNG and returns it as a Pillow image so the next steps can work on it directly.
If your photos are already online, you can skip the upload and send the address instead: requests.post(API_URL, headers=HEADERS, json={"image_url": url}). The response has the same shape.
Make Square Closet Tiles and Tag Colors
A closet grid looks tidy when every item sits on the same background, at the same scale, in the center of a square. The transparent PNG makes this easy: getbbox() returns the box around the non-transparent pixels, so you can crop to the garment and scale it to fill the tile.
The same transparency gives you color tags almost for free. Without the background, every remaining pixel belongs to the garment, so counting colors gives the color of the item and not of the door behind it. Save this as closet_tiles.py:
import colorsys
from collections import Counter
from PIL import Image


def make_tile(cutout, size=1000, fill=0.86, bg=(244, 244, 245)):
    """Crop to the garment and center it on a square tile with a neutral background."""
    item = cutout.crop(cutout.getbbox())
    scale = size * fill / max(item.size)
    item = item.resize((round(item.width * scale), round(item.height * scale)),
                       Image.LANCZOS)
    tile = Image.new("RGBA", (size, size), bg + (255,))
    tile.alpha_composite(item, ((size - item.width) // 2, (size - item.height) // 2))
    return tile.convert("RGB")


def color_name(r, g, b):
    h, s, v = colorsys.rgb_to_hsv(r / 255, g / 255, b / 255)
    h *= 360
    if v < 0.25:
        return "black"
    if s < 0.12:
        return "white" if v > 0.82 else "gray"
    if s < 0.30 and 20 <= h < 70:
        return "cream" if v > 0.7 else "beige"
    if h < 15 or h >= 345:
        return "red"
    if h < 40:
        return "brown" if v < 0.6 else "orange"
    if h < 70:
        return "yellow"
    if h < 170:
        return "green"
    if h < 255:
        return "navy" if v < 0.45 else ("light blue" if s < 0.45 else "blue")
    if h < 290:
        return "purple"
    return "pink"


def color_tags(cutout, top=2, min_share=8):
    """Name the main colors of the garment, ignoring transparent pixels."""
    small = cutout.copy()
    small.thumbnail((200, 200))
    pixels = [p[:3] for p in small.getdata() if p[3] > 200]
    counts = Counter(color_name(*p) for p in pixels)
    tags = [(name, round(100 * n / len(pixels))) for name, n in counts.most_common(top)]
    return [t for t in tags if t[1] >= min_share]  # drop hangers, labels, buttons


if __name__ == "__main__":
    from closet_api import remove_background
    for name in ["blouse", "jacket", "tshirt", "sneakers"]:
        cutout = remove_background(f"{name}.jpg")
        make_tile(cutout).save(f"{name}_tile.jpg", quality=90)
        print(f"{name:<9}", color_tags(cutout))
Output on our four photos (the number is the share of garment pixels):
blouse    [('beige', 73), ('brown', 14)]
jacket    [('light blue', 92)]
tshirt    [('black', 97)]
sneakers  [('black', 37), ('beige', 21)]
Three details make the tags usable. HSV works better than raw RGB distances, because a shadow on a light blue jacket is still light blue in hue, only darker. The min_share filter removes small objects: without it, the wooden hanger added "orange" to the black t-shirt. And the tag describes the color as photographed: under warm indoor light, the cream blouse and the white soles of the sneakers read as beige. If users shoot under very warm bulbs, let them correct the tag in one tap.
Batch Import a Closet from User Uploads
When a new user signs up, they often add twenty or thirty items in one go. Process them in parallel, retry network errors, and store two files per item: the transparent PNG for outfit boards and the tile for the grid. This script writes everything to a closet folder with a catalog.json your app can read:
import json
import time
from concurrent.futures import ThreadPoolExecutor
from pathlib import Path

import requests
from closet_api import remove_background
from closet_tiles import make_tile, color_tags

OUT = Path("closet")
OUT.mkdir(exist_ok=True)


def import_item(path, retries=3):
    for attempt in range(retries):
        try:
            cutout = remove_background(path)
            break
        except requests.RequestException as e:
            if attempt == retries - 1:
                return {"file": path.name, "error": str(e)}
            time.sleep(2 ** attempt)

    item_id = path.stem
    cutout.save(OUT / f"{item_id}.png")              # transparent, for outfit boards
    make_tile(cutout).save(OUT / f"{item_id}_tile.jpg", quality=88)  # for the grid
    return {"id": item_id, "colors": [c for c, _ in color_tags(cutout)],
            "png": f"{item_id}.png", "tile": f"{item_id}_tile.jpg"}


photos = sorted(Path("uploads").glob("*.jpg"))
start = time.time()
with ThreadPoolExecutor(max_workers=4) as pool:
    catalog = list(pool.map(import_item, photos))

(OUT / "catalog.json").write_text(json.dumps(catalog, indent=2))
print(f"{len(catalog)} items in {time.time() - start:.1f} s")
for item in catalog:
print(item.get("id"), item.get("colors", item.get("error")))4 items in 6.3 s
blouse ['beige', 'brown']
jacket ['light blue']
sneakers ['black', 'beige']
tshirt ['black']A failed item returns an error entry instead of stopping the whole import, so you can show the user which photo to retake. In a web app, run this in a background job and update the closet as items finish.
Build an Outfit Board from the Cutouts
Transparent PNGs can be combined freely, which is what turns a list of items into a styling feature. This function fits each cutout in a box on a canvas and adds a soft shadow so the items do not look pasted on:
from PIL import Image, ImageFilter


def place(board, png_path, box):
    """Fit a transparent cutout inside box (x, y, w, h) with a soft shadow."""
    item = Image.open(png_path).convert("RGBA")
    item = item.crop(item.getbbox())
    x, y, w, h = box
    scale = min(w / item.width, h / item.height)
    item = item.resize((round(item.width * scale), round(item.height * scale)),
                       Image.LANCZOS)
    ox, oy = x + (w - item.width) // 2, y + (h - item.height) // 2

    pad = 40  # room for the blur, so the shadow has no hard edges
    shadow = Image.new("RGBA", (item.width + 2 * pad, item.height + 2 * pad), (0, 0, 0, 0))
    mask = Image.new("L", shadow.size, 0)
    mask.paste(item.getchannel("A").point(lambda a: a * 0.25), (pad, pad))
    shadow.putalpha(mask.filter(ImageFilter.GaussianBlur(12)))
    board.alpha_composite(shadow, (ox - pad + 10, oy - pad + 14))
    board.alpha_composite(item, (ox, oy))


board = Image.new("RGBA", (1200, 750), (250, 247, 242, 255))
place(board, "closet/jacket.png", (60, 60, 520, 470))
place(board, "closet/tshirt.png", (620, 40, 520, 420))
place(board, "closet/sneakers.png", (380, 470, 440, 250))
board.convert("RGB").save("outfit_board.jpg", quality=90)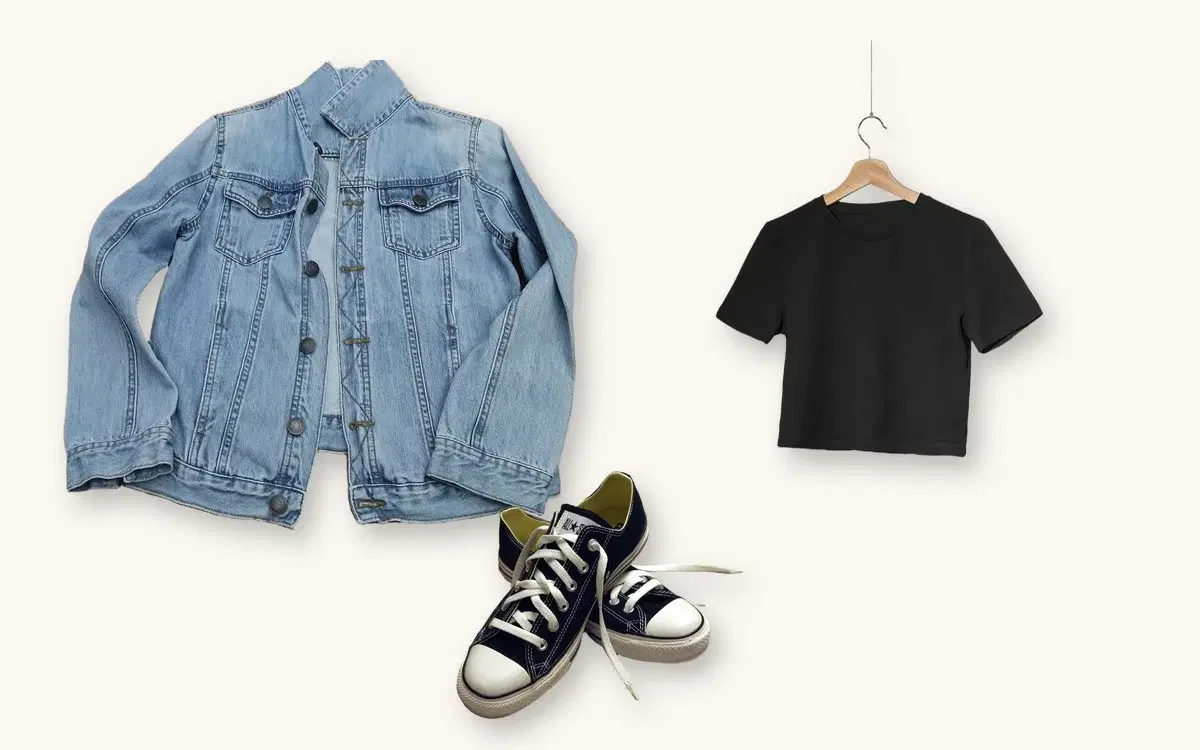
The shadow is padded before blurring. Without the padding, items that touch the edge of their photo, like the jacket here, get a shadow with a hard rectangular border. With the color tags from the previous step, you can also suggest combinations, for example only pairing items whose tags include a neutral color.
Production Tips
- Resize on the device or server before upload. 1500 pixels on the longest side is plenty for tiles and boards, and it keeps uploads small on mobile networks.
- Guide the photo, not the edit. A short hint in the camera screen ("one item, whole garment in frame") helps more than any post-processing. Background removal handles the messy room; the user only needs to keep the full item visible.
- Keep the transparent PNG as the master file. Tiles, thumbnails and boards can all be regenerated from it, so a redesign of the closet grid never needs a second API call.
- Process in a background job. Show the original photo right away, then swap in the tile when the cutout is ready. Users see their closet fill up instead of waiting on a spinner.
- Reuse the pipeline for resale listings. The same cutout on a white tile is what marketplaces expect for product photos. Our guide to background removal at scale for e-commerce covers white backgrounds and catalog rules, and the marketplace product image pipeline adds moderation and quality checks for seller uploads.
Next Step
Get a key on the Background Removal API page, save closet_api.py and closet_tiles.py, and run them on a few photos of your own clothes. For other output formats, see the transparent PNG API guide.
Sources
Frequently Asked Questions
- Can an API remove the background from clothing photos?
- Yes. A background removal API takes a photo of a garment and returns a PNG where everything except the item is transparent. In our tests, a blouse on a white door, a denim jacket on a table, a black t-shirt on a hanger and a pair of sneakers on carpet all came back as clean cutouts from a single request each.
- Does the hanger stay in the cutout?
- Yes, the hanger is treated as part of the object, which is what most closet apps want because it keeps the photo natural. If you prefer garments without hangers, ask users to lay items flat or photograph them on a mannequin.
- How do I detect the color of a garment after removing the background?
- Count only the opaque pixels of the cutout, convert them to HSV and map each one to a color name. Because the background is gone, the wall, door or table no longer pollutes the result. The color_tags function in this article tagged our denim jacket as light blue and our t-shirt as black.
- What image size should a wardrobe app send?
- Around 1500 pixels on the longest side is enough for closet tiles and outfit boards. Phone cameras produce 4000 pixel images, so resizing before upload cuts the transfer time without any visible change on a 1000 pixel tile.