
This tutorial uses the Face Analyzer API. See the docs, live demo, and pricing.
Buddy punching costs US employers an estimated $373 million per year. An employee badges in for a coworker who's running late, or swipes a shared card at a kiosk nobody watches. Traditional attendance systems (badge readers, PIN codes, even fingerprint scanners) can all be bypassed. A face recognition attendance system eliminates this: you can't lend someone your face. In this tutorial, you'll build a complete attendance system in Python using the Face Analyzer API for face registration, matching, and check-in logging.
Why Use a REST API Instead of OpenCV?
Every face attendance tutorial on the internet uses the same stack: OpenCV + dlib + the face_recognition library. It works, but it comes with baggage:
- dlib compilation requires cmake, boost, and C++ build tools. On some systems it takes 20+ minutes to install and regularly fails on ARM or minimal Docker images.
- Model management is on you. You download weights, handle versioning, and if you want better accuracy you swap models and retrain encodings.
- No GPU = slow. Processing a single face with dlib on CPU takes 200-500ms. Multiply that by a queue of employees at 9 AM.
- Scaling means re-architecting. When you go from one office to five, you need to sync face databases, manage model deployments, and handle infrastructure.
A cloud API handles all of this. You send an image over HTTP, get back a match in under a second. No dlib, no GPU, no model files. The face repository lives in the cloud and is accessible from any location. For employee attendance tracking across multiple offices, that matters.
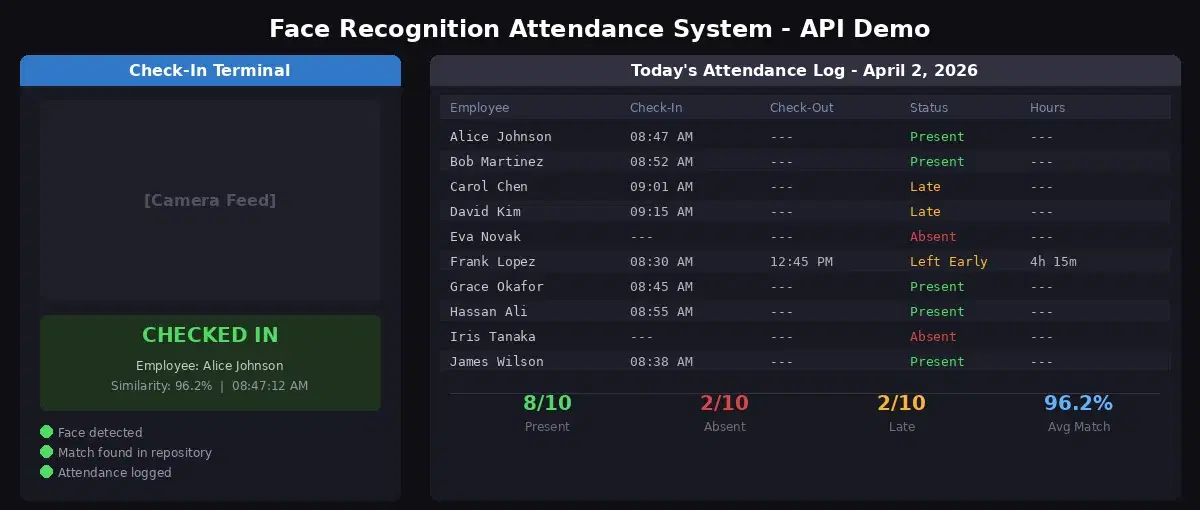
How Face Recognition Attendance Works
The attendance system has three phases. Registration happens once per employee. Check-in happens every day. Reporting is on-demand.
- Registration - HR uploads an employee's photo. The API extracts facial features and stores them in a named repository, linked to the employee's ID.
- Check-in - A camera at the entrance captures a photo. The API searches the repository for a match. If the similarity score exceeds the threshold, the system logs the employee's name and timestamp.
- Reporting - At any point, you can pull the attendance log to see who checked in, when, and who's absent.
Setting Up the Face Repository
First, create a repository to hold your employees' facial data. Think of it as a database table, but for faces.
import requests

BASE = "https://faceanalyzer-ai.p.rapidapi.com"
HEADERS = {
    "x-rapidapi-host": "faceanalyzer-ai.p.rapidapi.com",
    "x-rapidapi-key": "YOUR_API_KEY",
}

# Create a repository for your office
response = requests.post(
    f"{BASE}/create-facial-repository",
    headers={**HEADERS, "Content-Type": "application/x-www-form-urlencoded"},
    data={"repository_id": "office-hq"},
)
print(response.json())
# {"statusCode": 200, "body": {"message": "OK"}}
Registering Employees for Face Attendance
For each employee, upload a clear, front-facing photo. The API extracts facial features and stores them with an external ID that you control (employee ID, email, or name).
def register_employee(photo_path: str, employee_id: str):
    """Register an employee's face in the attendance repository."""
    with open(photo_path, "rb") as f:
        response = requests.post(
            f"{BASE}/save-face-in-repository",
            headers=HEADERS,
            files={"image": (photo_path, f, "image/jpeg")},
            data={
                "repository_id": "office-hq",
                "external_id": employee_id,
                "max_faces": "1",
            },
        )
    result = response.json()
    print(f"Registered {employee_id}: {result['body']['FacesId']}")
    return result

# Register your team
register_employee("photos/alice_johnson.jpg", "alice-johnson")
register_employee("photos/bob_martinez.jpg", "bob-martinez")
register_employee("photos/carol_chen.jpg", "carol-chen")
Each call returns a FacesId that you can use later to update or remove the face. The external_id is your key to link the face back to your HR system.
Building the Check-In Endpoint
This is the core of the system. A camera captures a photo, the API searches the repository, and if a match is found, attendance is logged.
from datetime import datetime
import json

THRESHOLD = 85  # minimum similarity percentage
ATTENDANCE_FILE = "attendance.json"

def load_attendance():
    try:
        with open(ATTENDANCE_FILE) as f:
            return json.load(f)
    except FileNotFoundError:
        return {}

def save_attendance(records):
    with open(ATTENDANCE_FILE, "w") as f:
        json.dump(records, f, indent=2)

def check_in(photo_path: str) -> dict:
    """Search for a face in the repository and log attendance."""
    with open(photo_path, "rb") as f:
        response = requests.post(
            f"{BASE}/search-face-in-repository",
            headers=HEADERS,
            files={"image": (photo_path, f, "image/jpeg")},
            data={"repository_id": "office-hq"},
        )

    result = response.json()["body"]
    matches = result.get("FaceMatches", [])

    if not matches:
        return {"status": "denied", "reason": "face not recognized"}

    best = matches[0]
    similarity = best["Similarity"]
    employee_id = best["ExternalImageId"]

    if similarity < THRESHOLD:
        return {"status": "denied", "reason": f"low confidence ({similarity}%)"}

    # Log attendance (prevent duplicate check-ins)
    today = datetime.now().strftime("%Y-%m-%d")
    records = load_attendance()
    day_records = records.get(today, {})

    if employee_id in day_records:
        return {
            "status": "already_checked_in",
            "employee": employee_id,
            "checked_in_at": day_records[employee_id]["check_in"],
        }

    day_records[employee_id] = {
        "check_in": datetime.now().strftime("%H:%M:%S"),
        "similarity": round(similarity, 1),
    }
    records[today] = day_records
    save_attendance(records)

    return {
        "status": "checked_in",
        "employee": employee_id,
        "time": day_records[employee_id]["check_in"],
        "similarity": similarity,
    }

# Test it
result = check_in("camera_capture.jpg")
print(result)
# {"status": "checked_in", "employee": "alice-johnson", "time": "08:47:12", "similarity": 96.2}
The duplicate prevention is important. Without it, the system logs the same person every time they walk past the camera. The code checks if the employee already has a record for today before writing.
Wrapping It in a Flask App
Turn the check-in function into an HTTP endpoint that a camera client can call.
from flask import Flask, request, jsonify

app = Flask(__name__)

@app.route("/check-in", methods=["POST"])
def check_in_endpoint():
    if "image" not in request.files:
        return jsonify({"error": "no image provided"}), 400

    image = request.files["image"]
    # Save temporarily
    temp_path = f"/tmp/checkin_{datetime.now().timestamp()}.jpg"
    image.save(temp_path)

    result = check_in(temp_path)
    return jsonify(result)

@app.route("/attendance", methods=["GET"])
def get_attendance():
    date = request.args.get("date", datetime.now().strftime("%Y-%m-%d"))
    records = load_attendance()
    return jsonify(records.get(date, {}))

@app.route("/register", methods=["POST"])
def register_endpoint():
    if "image" not in request.files or "employee_id" not in request.form:
        return jsonify({"error": "image and employee_id required"}), 400

    image = request.files["image"]
    employee_id = request.form["employee_id"]
    temp_path = f"/tmp/register_{employee_id}.jpg"
    image.save(temp_path)

    result = register_employee(temp_path, employee_id)
    return jsonify(result)

if __name__ == "__main__":
    app.run(port=5000)
Three endpoints: /register for HR to add employees, /check-in for the camera client, and /attendance to pull the daily log.
Testing with cURL
# Register an employee
curl -X POST http://localhost:5000/register \
  -F "image=@photos/alice_johnson.jpg" \
  -F "employee_id=alice-johnson"

# Check in
curl -X POST http://localhost:5000/check-in \
  -F "image=@camera_capture.jpg"

# Get today's attendance
curl http://localhost:5000/attendance
JavaScript (Node.js)
const fs = require("fs");
const FormData = require("form-data");

async function checkIn(imagePath) {
  const form = new FormData();
  form.append("image", fs.createReadStream(imagePath));

  const response = await fetch("http://localhost:5000/check-in", {
    method: "POST",
    body: form,
  });

  const result = await response.json();
  console.log(result);
  // { status: "checked_in", employee: "alice-johnson", time: "08:47:12", similarity: 96.2 }
}

checkIn("camera_capture.jpg");
Anti-Spoofing and Buddy Punching Prevention
The whole point of face recognition attendance is that you can't clock in for someone else. But a basic system without anti-spoofing measures can still be tricked with a printed photo or a phone screen showing someone's face. Here's how to harden it:
- Check for sunglasses. The API returns a
Sunglassesboolean in the face analysis response. Reject check-ins where sunglasses are detected, as they can mask identity. - Add liveness detection. Before sending the image to the attendance API, require the user to blink or turn their head. A printed photo can't do that. This requires a client-side camera app with basic frame analysis.
- Log the similarity score. Legitimate check-ins typically score 90-99%. If someone consistently scores 85-88%, investigate. It could indicate a photo being used instead of a real face.
- Combine with location. If the check-in device is at a fixed location, verify that the request comes from the expected IP or GPS coordinates.
Adding Extra Data to Attendance Logs
The Face Analyzer API returns more than just a match. The /faceanalysis endpoint gives you age range, gender, emotion, and smile detection for each face. You can enrich your attendance logs with this data.
def check_in_with_analysis(photo_path: str) -> dict:
    """Check in and capture facial attributes."""
    # Step 1: Search for match
    check_result = check_in(photo_path)
    if check_result["status"] != "checked_in":
        return check_result

    # Step 2: Analyze the face for extra data
    with open(photo_path, "rb") as f:
        analysis = requests.post(
            f"{BASE}/faceanalysis",
            headers=HEADERS,
            files={"image": f},
        )

    face = analysis.json()["body"]["faces"][0]["facialFeatures"]
    check_result["emotion"] = face["Emotions"][0]
    check_result["smile"] = face["Smile"]
    check_result["age_range"] = f"{face['AgeRange']['Low']}-{face['AgeRange']['High']}"

    return check_result

# Result includes attendance + mood data
# {"status": "checked_in", "employee": "alice-johnson", "time": "08:47:12",
#  "similarity": 96.2, "emotion": "HAPPY", "smile": true, "age_range": "25-35"}
This is useful for workplace analytics: tracking team mood over time, or for age verification in environments where minors shouldn't have access.
Face Recognition vs. Fingerprint Attendance
| Criteria | Face Recognition | Fingerprint |
|---|---|---|
| Contact required | No (contactless) | Yes (touch sensor) |
| Speed | Under 1 second | 1-3 seconds |
| Failure conditions | Poor lighting, sunglasses | Wet/dirty fingers, cuts |
| Buddy punching risk | Very low (with liveness) | Low (silicone molds exist) |
| Hardware cost | Any camera ($20+) | Dedicated scanner ($100-500) |
| Walk-by capture | Yes (passive check-in) | No (requires active scan) |
Privacy and GDPR Compliance
Biometric attendance systems handle sensitive data. Here's the minimum you need to get right:
- Get explicit consent. Employees must opt in to facial recognition attendance. Under GDPR Article 9, biometric data requires explicit consent before processing.
- Don't store raw photos. The API extracts and stores facial features (mathematical embeddings), not the original image. Delete the captured photo after the API call returns.
- Allow deletion. Employees who leave the company or withdraw consent must be removed from the repository. Use the
/delete-face-from-repositoryendpoint. - Document your processing. Maintain a record of why you collect biometric data, how long you retain it, and who has access. This is a GDPR requirement (Article 30).
Tips and Best Practices
- Enroll with high-quality photos. Front-facing, well-lit, neutral expression. One good enrollment photo beats five mediocre ones. Update the enrollment photo annually or when someone changes their appearance significantly.
- Set the threshold to 85% for general use. This balances security against convenience. Raise it to 90%+ for high-security areas. Lower it to 80% for events where a missed check-in is worse than a false match.
- Handle the 9 AM rush. If 50 people arrive in 10 minutes, your system needs to handle the throughput. The API processes each request in under a second, but queue the camera captures client-side and send them sequentially.
- Always provide a fallback. Camera down? Server unreachable? Have a manual check-in option (badge, PIN) for edge cases. Face recognition is the primary method, not the only one.
A face recognition attendance system built on a REST API is simpler to deploy and maintain than the OpenCV + dlib approach that dominates every tutorial online. No C++ compilation, no GPU, no model files. Register faces, search for matches, log timestamps. The Face Analyzer API handles the recognition, your code handles the business logic. For more face-related projects, check out the access control tutorial (security-focused) or the age verification guide (compliance-focused).
Frequently Asked Questions
- How does a face recognition attendance system work?
- Employees register by uploading a photo. Their facial features are stored in a cloud repository. At check-in, a camera captures their face and the API searches the repository for a match. If the similarity score exceeds a threshold (typically 85%), the system logs the employee as present with a timestamp. The entire check takes under one second.
- Is face recognition better than fingerprint for attendance?
- For contactless environments, yes. Face recognition works from a distance without physical contact, which is faster and more hygienic. Fingerprint scanners require touch and fail with wet or dirty fingers. Face recognition also captures check-ins passively (walk-by cameras) while fingerprints always require an active scan.
- Can a face recognition attendance system be fooled?
- Basic systems can be tricked with a printed photo. To prevent this, add liveness detection (blink check, head turn) before sending the image to the API. The Face Analyzer API also returns whether the person is wearing sunglasses, which helps filter low-quality captures that could indicate spoofing attempts.


