This tutorial uses the Face Analyzer API. See the docs, live demo, and pricing.
Your fintech app needs KYC. A user uploads a selfie and a photo of their ID. Your backend needs to answer one question: is this the same person? Between the shutter click and the green checkmark, three things happen.
This article breaks down those three steps, compares the models used at each stage, and shows how to implement the whole pipeline in 5 lines of Python.
The 3 Steps of Face Matching
Every face matching system, from Apple Face ID to airport e-gates, follows the same pipeline:
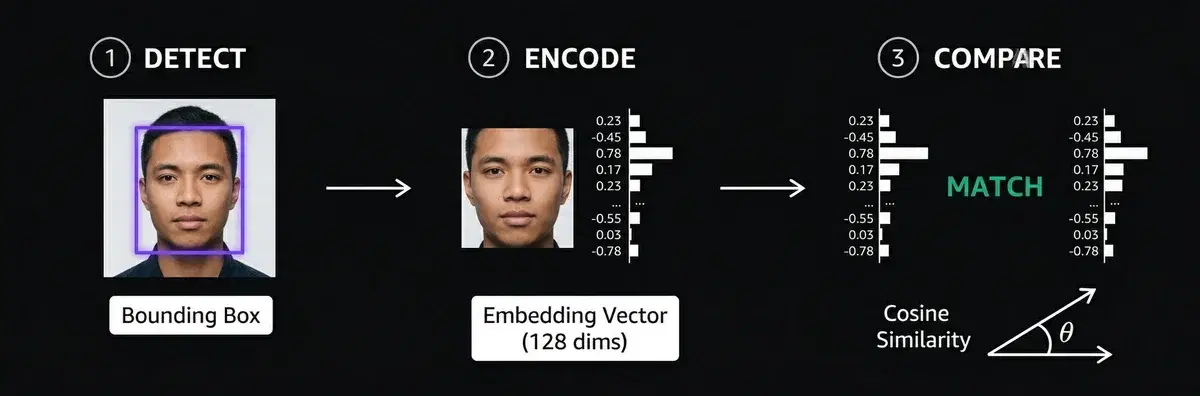
Step 1: Detect
Find the face in the image. The detector outputs a bounding box (x, y, width, height) around each face. This crops out the background, hair, and clothing so the next step only sees the face.
| Detector | Accuracy (WIDER FACE) | Speed | Best for |
|---|---|---|---|
| RetinaFace | 96.9% (easy) | ~3.8s/face (CPU) | Max accuracy, batch processing |
| MTCNN | 84.8% (easy) | ~0.4s/face | Good balance, widely used |
| MediaPipe | Lower | ~0.04s/face | Real-time, mobile, edge |
| YuNet | Good | ~0.03s/face | Fastest, real-time on CPU |
The tradeoff is always accuracy vs speed. RetinaFace catches faces that others miss (small, occluded, angled), but it is 100x slower than MediaPipe. For KYC where the user takes a clear selfie, any detector works. For surveillance with crowded scenes, RetinaFace is the only reliable choice.
Step 2: Encode
Convert the cropped face into a numerical vector called an embedding. A neural network takes the face pixels and outputs a list of numbers, typically 128 or 512 values.
Photo of Alice → [0.23, -0.45, 0.78, 0.12, -0.33, ...]  (128 numbers)
Photo of Alice → [0.21, -0.47, 0.76, 0.14, -0.31, ...]  (similar!)
Photo of Bob   → [-0.67, 0.89, -0.12, 0.55, 0.44, ...]  (very different)
The key property: two photos of the same person produce similar vectors. Two photos of different people produce distant vectors. The model learns this during training on millions of face pairs.
| Model | LFW Accuracy | Embedding Size | Notes |
|---|---|---|---|
| FaceNet (Google, 2015) | 99.63% | 128 | Introduced triplet loss. Still competitive |
| ArcFace (2018) | 99.83% | 512 | Current standard. Best on hard benchmarks |
| SFace (2021) | 99.60% | 128 | Better on low-res and surveillance images |
LFW (Labeled Faces in the Wild) is the standard benchmark. All modern models score above 99%, which means the difference in practice comes down to how well they handle edge cases: bad lighting, extreme angles, low resolution.
Step 3: Compare
Measure the distance between two embedding vectors. If the distance is below a threshold, the faces match.
| Metric | How it works | Match threshold | Used by |
|---|---|---|---|
| Cosine similarity | Angle between vectors. 1.0 = identical | > 0.6 | ArcFace, most APIs |
| Euclidean distance | Straight-line distance. Lower = closer | < 1.1 | FaceNet (original paper) |
The threshold is the critical parameter. Too low and you get false rejections (same person not matched). Too high and you get false accepts (different people matched). In production, most systems use cosine similarity with a threshold around 0.6, tuned based on their tolerance for each error type.
That is the entire pipeline. Detect, encode, compare. Everything else (liveness detection, anti-spoofing, lighting normalization) is built on top of these three steps.
The Code (5 Lines)
The Face Analyzer API runs detect + encode + compare on cloud GPUs. You send two images, it returns match or no match.
import requests

response = requests.post(
    "https://faceanalyzer-ai.p.rapidapi.com/compare-faces",
    headers={"x-rapidapi-key": "YOUR_API_KEY", "x-rapidapi-host": "faceanalyzer-ai.p.rapidapi.com"},
    files={"source_image": open("selfie.jpg", "rb"), "target_image": open("id_photo.jpg", "rb")},
)
print(response.json()["body"])
The response tells you if the faces match:
{
  "matchedFaces": [
    {
      "boundingBox": {"topLeft": {"x": 0.47, "y": 0.27}, "bottomRight": {"x": 0.89, "y": 0.64}},
      "landmarks": {"eyeLeft": {...}, "eyeRight": {...}, "mouth": {...}}
    }
  ],
  "unmatchedFaces": []
}
matchedFaces is not empty = same person. unmatchedFaces lists faces in the target image that did not match the source face.
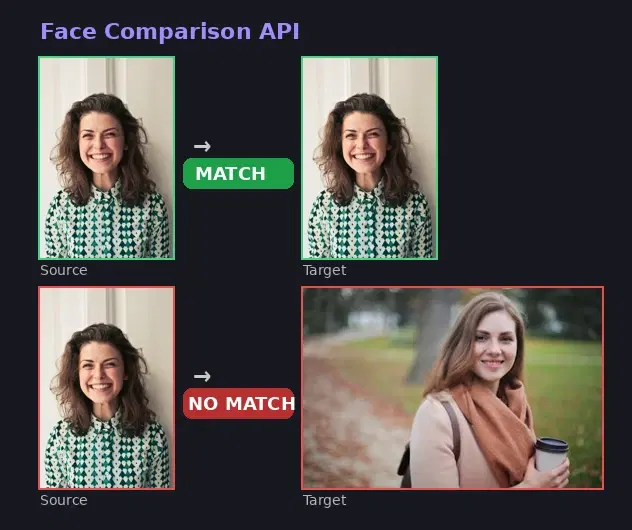
Real Test: Same Person vs Different Person
We tested with real photos to verify the results.
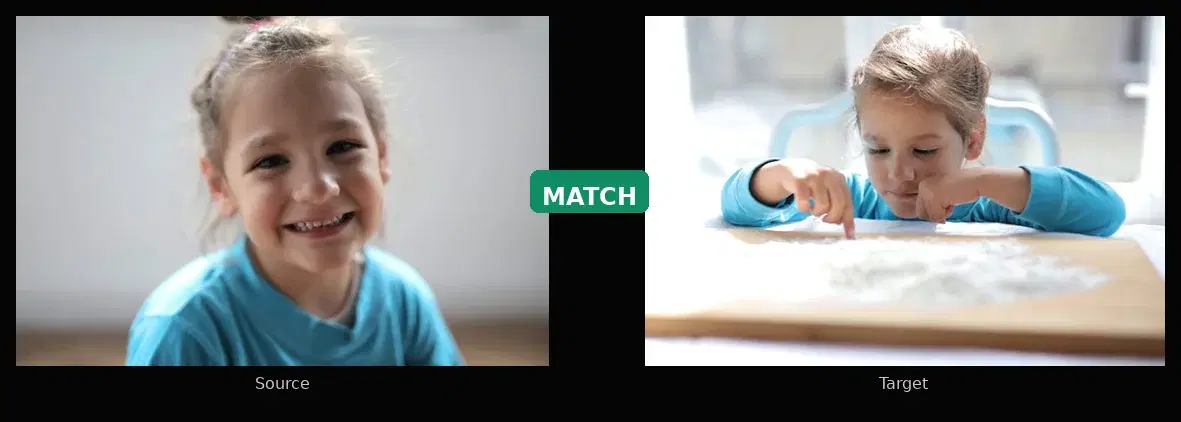
Test 1: Same person, two different photos
files = {
    "source_image": open("photo_1.jpg", "rb"),
    "target_image": open("photo_2.jpg", "rb"),
}
result = requests.post(URL, headers=HEADERS, files=files).json()["body"]
print(f"Matched: {len(result['matchedFaces'])}")    # 1
print(f"Unmatched: {len(result['unmatchedFaces'])}") # 0
API response:
{
  "matchedFaces": [
    {
      "boundingBox": {"topLeft": {"x": 0.31, "y": 0.12}, "bottomRight": {"x": 0.72, "y": 0.88}},
      "landmarks": {"eyeLeft": {"center": {"x": 0.43, "y": 0.41}}, "eyeRight": {"center": {"x": 0.62, "y": 0.42}}}
    }
  ],
  "unmatchedFaces": []
}
Result: matched. Different photo, different angle, different lighting. matchedFaces contains the face with its bounding box and landmarks. unmatchedFaces is empty.
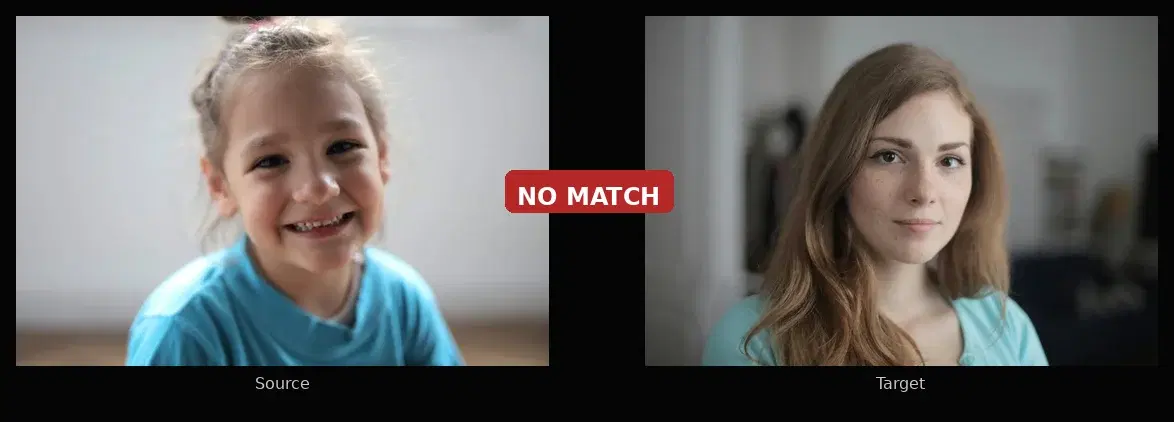
Test 2: Two different people
files = {
    "source_image": open("person_a.jpg", "rb"),
    "target_image": open("person_b.jpg", "rb"),
}
result = requests.post(URL, headers=HEADERS, files=files).json()["body"]
print(f"Matched: {len(result['matchedFaces'])}")    # 0
print(f"Unmatched: {len(result['unmatchedFaces'])}") # 1
API response:
{
  "matchedFaces": [],
  "unmatchedFaces": [
    {
      "boundingBox": {"topLeft": {"x": 0.28, "y": 0.10}, "bottomRight": {"x": 0.75, "y": 0.92}},
      "landmarks": {"eyeLeft": {"center": {"x": 0.40, "y": 0.42}}, "eyeRight": {"center": {"x": 0.60, "y": 0.43}}}
    }
  ]
}
Result: not matched. matchedFaces is empty. The target face appears in unmatchedFaces because it does not match the source.
Where Developers Use This
- KYC onboarding: compare a selfie to the photo on an uploaded ID document
- Access control: verify an employee against a face database before granting entry
- Duplicate detection: block users who create multiple accounts with the same face
- Photo apps: automatically group photos by person using the face repository endpoints
Sources
- FaceNet: A Unified Embedding for Face Recognition and Clustering : the Google paper (2015) that introduced triplet loss for face embeddings
- ArcFace: Additive Angular Margin Loss for Deep Face Recognition : the current standard loss function for face embedding models (2018)
- NIST Face Recognition Vendor Test (FRVT) : the benchmark used to evaluate face recognition systems worldwide
- LearnOpenCV: Face Detection Model Comparison : benchmark of face detectors (RetinaFace, MTCNN, MediaPipe, YuNet) on WIDER FACE dataset
- RetinaFace and MTCNN Performance Comparison : WIDER FACE accuracy benchmarks (96.9% vs 84.8% on easy set)
- IEEE: Comparison of ArcFace, FaceNet and FaceNet512 on DeepFace Framework : LFW accuracy benchmarks for embedding models (99.83% ArcFace, 99.63% FaceNet)
Frequently Asked Questions
- How does face matching work?
- Face matching works in three steps. First, a face detector locates the face in the image and draws a bounding box around it. Second, a neural network converts the cropped face into a numerical vector called an embedding (typically 128 or 512 numbers). Third, the system compares two embeddings using cosine similarity or Euclidean distance. If the distance is below a threshold, the faces match.
- What is a face embedding?
- A face embedding is a numerical vector (a list of numbers like [0.23, -0.45, 0.78, ...]) that represents a face. Two photos of the same person produce similar vectors, while photos of different people produce distant vectors. Models like FaceNet and ArcFace are trained to produce these embeddings.
- Can I do face matching without installing dlib or a GPU?
- Yes. A Face Comparison API runs the detection and embedding models on cloud GPUs. You send two images via HTTP and get back a match or no-match result. No local model, no dlib, no GPU needed. The free tier includes 30 requests per month.