This tutorial uses the Object Detection API. See the docs, live demo, and pricing.
Whether you are building an inventory management system, an autonomous checkout kiosk, or a security monitoring dashboard, the ability to detect and locate objects in images is a foundational capability. An object detection API takes the complexity of training and hosting computer vision models off your plate, giving you bounding boxes, labels, and confidence scores through a single REST call.
Why Object Detection Beats Plain Classification
Traditional image classification tells you what is in an image. Object detection goes further: it tells you where each item is and how confident the model is about each prediction. This spatial information enables use cases that simple classification cannot touch, from counting products on a shelf to drawing real-time annotations on a security feed.
Training your own object detection model requires thousands of labeled images, GPU infrastructure, and ongoing maintenance as your data distribution shifts. The Object Detection API eliminates all of that. You send an image, and you get structured JSON with every detected object, its class label, confidence score, and bounding box coordinates. Let's see how it works.
If you are weighing a hosted API against running your own model, two comparisons go deeper on that trade-off: YOLO vs a cloud API and RF-DETR vs YOLO vs a cloud API.
Getting Started with the Object Detection API
The API accepts an image URL and returns a list of detected objects. Each object includes a label (like "car", "person", or "dog"), a confidence score from 0 to 100, and bounding box coordinates that describe a rectangle around the object. Here are working examples in three languages.
cURL
curl -X POST \
  'https://objects-detection.p.rapidapi.com/objects-detection' \
  -H 'x-rapidapi-host: objects-detection.p.rapidapi.com' \
  -H 'x-rapidapi-key: YOUR_API_KEY' \
  -H 'Content-Type: application/x-www-form-urlencoded' \
  -d 'url=https://example.com/street-scene.jpg'
Python
import requests

url = "https://objects-detection.p.rapidapi.com/objects-detection"
headers = {
    "x-rapidapi-host": "objects-detection.p.rapidapi.com",
    "x-rapidapi-key": "YOUR_API_KEY",
    "Content-Type": "application/x-www-form-urlencoded",
}

response = requests.post(url, headers=headers, data={"url": "https://example.com/street-scene.jpg"})
data = response.json()

# Iterate through detected object categories
for label in data["body"]["labels"]:
    name = label["Name"]
    for instance in label["Instances"]:
        conf = instance["Confidence"]
        bb = instance["BoundingBox"]
        print(f"{name} ({conf:.0f}%) at [{bb['topLeft']['x']:.2f}, {bb['topLeft']['y']:.2f}] -> [{bb['bottomRight']['x']:.2f}, {bb['bottomRight']['y']:.2f}]")

# Real output on a desk photo (Confidence is 0 to 100):
# Mobile Phone (96%) at [0.32, 0.34] -> [0.76, 0.74]
# Camera (96%), Person (70%)
JavaScript (Node.js)
const response = await fetch(
  "https://objects-detection.p.rapidapi.com/objects-detection",
  {
    method: "POST",
    headers: {
      "x-rapidapi-host": "objects-detection.p.rapidapi.com",
      "x-rapidapi-key": "YOUR_API_KEY",
      "Content-Type": "application/x-www-form-urlencoded",
    },
    body: new URLSearchParams({
      url: "https://example.com/street-scene.jpg",
    }),
  }
);

const data = await response.json();

// Log each detected object with its bounding box
data.body.labels.forEach((label) => {
  label.Instances.forEach((instance) => {
    const { topLeft, bottomRight } = instance.BoundingBox;
    console.log(
      `${label.Name} (${instance.Confidence.toFixed(1)}%) at [${topLeft.x}, ${topLeft.y}] -> [${bottomRight.x}, ${bottomRight.y}]`
    );
  });
});
Understanding the Response
The API returns a list of detected label categories, each containing one or more instances with bounding box coordinates. The coordinates are normalized between 0 and 1, where topLeft marks the upper-left corner and bottomRight marks the lower-right corner of the detection rectangle. Multiply by the image width and height to get pixel values. You can use these to draw rectangles on the original image, crop individual objects for further processing, or count how many instances of a given class appear in the scene.
Confidence scores (0 to 100) let you filter out low-quality predictions. A common pattern is to only keep detections above 60 for production use, while logging everything above 30 for analytics and model monitoring.
Draw the Boxes and Crop Detected Objects
Normalized coordinates are made for two jobs: annotating the image and cropping objects out for downstream processing. Multiply each corner by the image size, then use Pillow to draw labeled boxes and save each detection as its own file:
from PIL import Image, ImageDraw
im = Image.open("scene.jpg").convert("RGB")
W, H = im.size
draw = ImageDraw.Draw(im)
for label in data["body"]["labels"]:
for inst in label["Instances"]:
if inst["Confidence"] < 60: # keep confident detections (0-100)
continue
bb = inst["BoundingBox"]
box = (bb["topLeft"]["x"] * W, bb["topLeft"]["y"] * H,
bb["bottomRight"]["x"] * W, bb["bottomRight"]["y"] * H)
draw.rectangle(box, outline="lime", width=4)
draw.text((box[0] + 4, box[1] + 4),
f"{label['Name']} {inst['Confidence']:.0f}%", fill="lime")
# crop the object out for the next pipeline stage
im.crop(tuple(int(v) for v in box)).save(f"{label['Name']}.jpg")
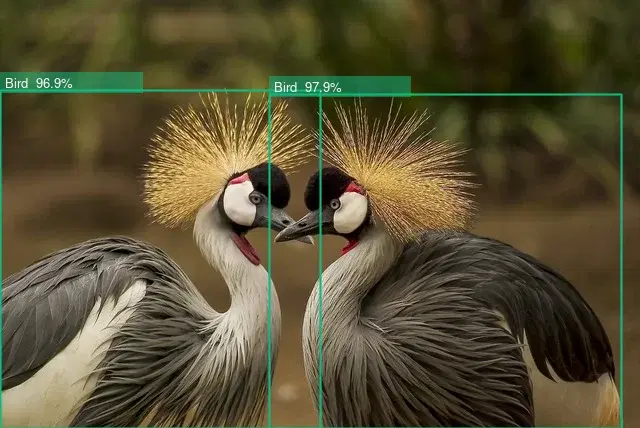
im.save("annotated.jpg")That loop is exactly what produced the annotated desk scene below: each detection became a green box on the image and a standalone crop you can feed into a classifier, a background remover, or an OCR step.

Real-World Use Cases
The Object Detection API is versatile enough to power dozens of different applications. Here are four scenarios where developers are already putting it to work.
1. Retail Shelf Auditing
Retailers use object detection to analyze shelf photos taken by field reps or in-store cameras. The API identifies product categories and their positions, making it possible to verify planogram compliance, detect out-of-stock items, and track competitor placement without manual counting.
2. Security and Surveillance
Feed frames from security cameras into the API to detect people, vehicles, or specific objects in restricted zones. Because the API returns bounding boxes, you can trigger alerts only when a detected object enters a defined region of interest, reducing false alarms compared to simple motion detection. Combine this with face detection for a layered identification pipeline.
3. Accessibility and Scene Description
Build tools that describe images to visually impaired users. Object detection provides the raw ingredients: "This image contains 2 people, 1 dog, and a park bench." Combine these labels with spatial relationships ("the dog is to the left of the bench") to generate natural-language scene descriptions.
4. Image Processing Pipelines
Object detection often serves as the first step in a multi-stage pipeline. Detect the main subject in a photo, crop it, and then pass the cropped region to a background removal API for a clean cutout. This chain works especially well for e-commerce product photography, where sellers upload cluttered images that need to be standardized.
Tips and Best Practices
Optimize Image Size Before Sending
Resize to about 1024px on the longest side before sending. A 20-megapixel raw photo wastes bandwidth and slows your pipeline; 1024px is usually enough for detection and cuts latency without meaningfully affecting accuracy.
Filter by Confidence Threshold
Set the threshold to your use case: 40 for surveillance, 70 for auto-tagging. A lower cutoff minimizes missed detections in safety-critical apps; a higher one minimizes incorrect labels in user-facing features.
Cache Results for Repeated Images
Cache detections by image hash for images analyzed repeatedly. A product-catalog image shown across many pages does not need re-analysis. Keying on the hash saves API calls and keeps response times instant for repeated queries.
Handle Edge Cases Gracefully
Expect zero-detection results and handle the empty array. Abstract patterns, or objects too small or obscured, can return nothing. Show a friendly "No objects detected" message rather than leaving the UI in a broken state.
Batch Processing for High Volume
Run requests concurrently and back off on 429s. For hundreds or thousands of images, use a connection pool or job queue with exponential backoff on rate-limit responses. A well-tuned queue clears thousands of images per hour without throttling.
Object detection is one of the most versatile capabilities in computer vision, and the Object Detection API makes it accessible with a single HTTP request. Whether you are counting items, drawing annotations, or feeding downstream pipelines, the combination of labels, confidence scores, and bounding boxes gives you everything you need to build production-grade features today.
Frequently Asked Questions
- What is an object detection API?
- An object detection API is a cloud service that identifies and locates objects in images. It returns a list of detected objects, each with a label (e.g., 'car', 'person', 'dog'), a confidence score, and bounding box coordinates. You send an image via HTTP and get structured JSON results.
- What is the difference between image classification and object detection?
- Image classification assigns a single label to an entire image (e.g., 'this is a photo of a cat'). Object detection goes further by finding multiple objects in the image, identifying what each one is, and pinpointing their exact locations with bounding boxes.
- How does an object detection API return results?
- The API returns JSON with a labels array. Each detected class has a Name, a Confidence from 0 to 100, and one or more Instances, each with a normalized BoundingBox given as topLeft and bottomRight corners (values from 0 to 1). Multiply those by the image width and height to get pixel coordinates.